If you are looking for how to boost a post on Facebook, the process is straightforward once you understand the available settings. Facebook lets eligible Pages and profiles in Professional Mode promote an existing post with a budget, giving it additional paid reach and opportunities for actions such as reactions, comments, shares, page visits and followers.
In this guide we’ll walk you through how to boost a post on Facebook step by step, including the goal, ad creative, audience, budget, placements and other settings you may see before launching your promotion. We’ll also explain when boosting a post makes sense, and when Meta Ads Manager is a better fit for more structured campaign management, measurement and optimization.
A quick note before you start: The settings and steps in this guide on how to boost a post on Facebook are based on the Automatic goal, where Meta selects the most relevant goal for your promotion based on your settings. If you choose a different, more specific goal instead, you may see 2-3 additional or different options depending on that goal, though most of the remaining settings covered here stay largely the same.
Table of Contents
What Is a Facebook Boosted Post?
Boosting a Facebook post means putting money behind content you’ve already published, turning an organic post into a paid ad without building a full campaign from scratch. Rather than starting with a blank slate, you’re working with something that’s already live and ideally, already resonating with your audience. Understanding this distinction matters before you learn how to boost a post on Facebook, since the settings only make sense once you know what you’re promoting and why.
From a practical perspective, you can consider boosting a post when you want to give existing content additional paid reach and encourage actions such as:
- Likes and reactions
- Comments
- Shares
- Page visits and followers
- Other available actions supported by the selected goals
For example: If a post is already relevant to your audience and you want more people to discover and interact with it, Boost Post can be a straightforward way to put paid distribution behind that content.
The important point is to have a clear purpose for the promotion before spending your budget.
How to Boost a Post on Facebook
To boost a post on Facebook, select an eligible post and choose Boost Post or follow the available advertising option that leads to the Boost Post flow.
The current flow covered in this guide includes:
- Goal
- Ad creative
- Advantage+ creative
- Special Ad category
- Audience
- AI info
- Ad transparency
- Schedule and Duration
- Placements
- Payment method
- Review and make the promotion live
Before launch, Meta may also show Estimated Daily Results based on your selected settings.
When Should You Boost a Post on Facebook?
Consider boosting when you already have a published post that you want more people to see and your objective is relatively straightforward, particularly when you want to encourage likes, shares or other engagement actions. This is really the core decision point in how to boost a post on Facebook effectively: a good setup can’t fix the wrong call at this stage.
A suitable post may be:
- Relevant to your intended audience
- Clear and easy to understand
- Designed to encourage engagement
- Strong enough that you are comfortable putting paid distribution behind it
For campaigns where you need more structured control over campaign setup, measurement, testing, analysis and optimization, Meta Ads Manager provides a broader advertising environment.
Boost Post isn’t inherently the right or wrong choice. The appropriate option depends on what you’re trying to accomplish and how much control you need over the campaign.
What If You Don’t See the Boost Post Option?
The Boost Post option doesn’t always appear directly on every new Page, Professional Mode profile or post.
Depending on your account and current Facebook interface, you may instead see options such as Create an ad, Ad center or other advertising related options on the post.
In some cases, selecting Create an ad may take you to a screen indicating that this post can be boosted. You may then see an option such as See Eligible Content, which can lead you to an eligible post and eventually expose the Boost Post option.
So, not seeing Boost Post directly on the post doesn’t necessarily mean that the post can’t be promoted.
The available options can vary based on factors such as Page, Professional Mode Profile, the post itself, account eligibility, location, selected advertising options and Meta’s current interface.
If you’re setting up a new Page or Professional Mode Profile, it’s worth checking the available advertising options rather than assuming that the Boost Post option may appear directly beneath the post.
Boost Post vs Meta Ads Manager
Here’s how the two options compare at a glance.
| Boost Post | Meta Ads Manager |
| Starts with an existing post | Built for structured campaign creation |
| Simpler setup | Broader campaign control |
| Useful for straightforward promotion | Suited for more structured performance campaign |
| Fewer setup decisions | Greater control over campaign configuration |
| Provides available performance information | Broader reporting, analysis, testing and optimization capabilities |
Meta positions Ads Manager as an environment for creating, assessing, monitoring, tracking and optimizing advertising campaigns.
The important distinction isn’t that Boost Post has no measurement. You can review actual performance after a promotion runs. The difference is the depth of campaign controls, reporting, testing and optimization available in the broader Ads Manager environment.
Who Can Boost a Post on Facebook?
Boost Post is generally available to eligible Facebook pages and eligible profiles using Professional Mode. However, the option may not appear for every account or post.
Possible reasons include:
- The post isn’t eligible
- Your page or profile doesn’t currently have access
- The content or destination has restrictions
- Your advertising account has restrictions
- The selected goal is unavailable
A standard personal Facebook profile shouldn’t be assumed to have the same Boost Post functionality as an eligible Page or Professional Mode profile. If you’re trying to boost from a personal account, check whether switching to Professional Mode unlocks the option, since standard personal profiles typically don’t have access to it.
Before You Boost a Post on Facebook
Before spending your budget, check Four things.
Your Post
Is the content clear, accurate and worth putting additional distribution behind?
Your Objective
What do you want the promotion to achieve?
For an engagement-focused boost, this could be more likes, comments, shares.
Your Audience
Who is likely to find the post relevant?
Your Budget
How much are you comfortable spending and for how long?
Having these four points clear before opening the Boost Post setup can make the rest of the process much easier.
Boost a Post on Facebook: Settings Explained
Once you select Boost Post, the current interface takes you through a series of settings.
1. Goal
The first setting is Goal. Your goal selection is really the first real decision in how to boost your Facebook post, since it shapes every option that follows.
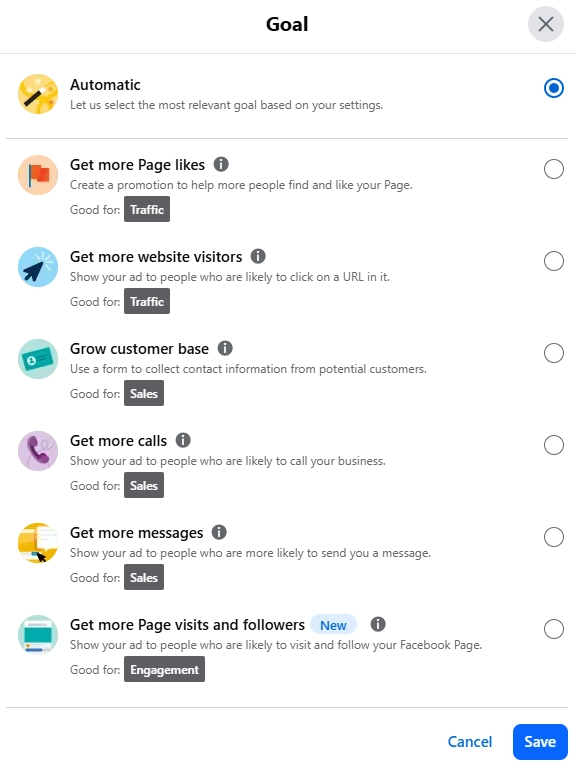
Current option can include:
- Automatic: Facebook selects the goal automatically based on your settings
- Get more page likes (Traffic)
- Get more website visitors (Traffic)
- Grow customer base (Sales)
- Get more calls (Sales)
- Get more messages (Sales)
- Get more Page visits and more followers (Engagement)
Choose the option that most closely matches what you want the promotion to accomplish. Selecting a different goal may change the options available later in the setup.
A note on Meta Pixel: If you select a goal like “Get more website visitors,” the current interface may also prompt you to connect or select a Meta Pixel. A Meta Pixel is a piece of code that you put on your website to measure the effectiveness of your ads or marketing messages. If you already have one set up, you can choose the Pixel you want to use to track conversions.
For a boosted post, this setting has limited practical value. Boost Post doesn’t use Pixel data for retargeting, custom audiences or conversion optimization the way Ads Manager does, so you can leave it as-is or skip it without much impact on your boost’s performance. If you are planning to eventually run structured campaigns in Ads Manager, having your Pixel installed and firing is worth doing regardless, since it’s a prerequisite for meaningful optimization there.
If you select a goal other than Automatic, you may observe 2-3 different options depending on the goal you’ve chosen, such as the Pixel prompt above for website visit goal. Most of the remaining settings covered under Automatic goal such as Audience, Budget, Schedule and Placements, stay largely similar regardless of which goal you select.
2. Ad Creative
The Ad Creative section controls the creative elements used to present your promoted post.
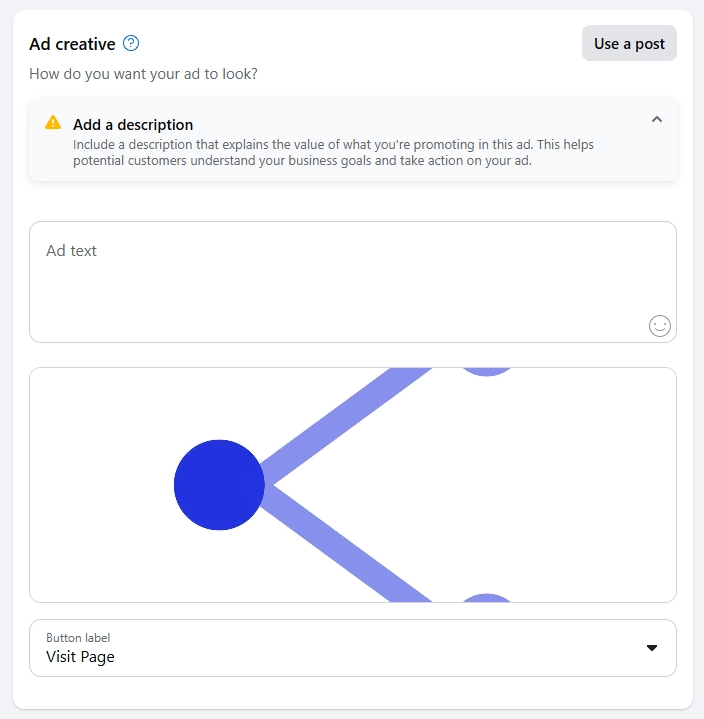
Add a Description
You may see a field with guidance to describe the value of what you’re promoting. Use this space to make the value of the promoted content clear and help people understand what you are offering and what action they can take.
Your Post
The existing Facebook post you selected is used as the basis of the promotion. Review it before continuing to make sure the creative, ad text and destination are appropriate for paid distribution.
Select Post CTA Button
You may be able to select a call-to-action button from the available drop-down options. Choose a CTA that is consistent with the action you want people to take.
Ad Preview
As you make changes, the current interface typically shows a live preview, along with a See All Previews option to check how the ad looks across different placements.
3. Advantage+ Creative
Advantage+ Creative is a separate setting from the main Ad creative section. The interface explains that Meta can use its data to automatically deliver different ad creative variations when they are likely to improve performance.
These automated variations can give Meta more flexibility to adapt eligible creative elements during delivery.
4. Special Ad Category
Some ads require a Special Ad Category.
This can apply to:
- Financial products and services
- Employment
- Housing
- Social issues, elections and politics
Selecting a Special Ad category can limit some audience selection options.
If your promotion falls into one of these categories, make sure you select the appropriate category rather than trying to work around the available restrictions.
5. Audience
The Audience section determines who sees your promotion. Getting your audience right is one of the most important parts of boosting a post on Facebook, since it affects both cost and relevance.
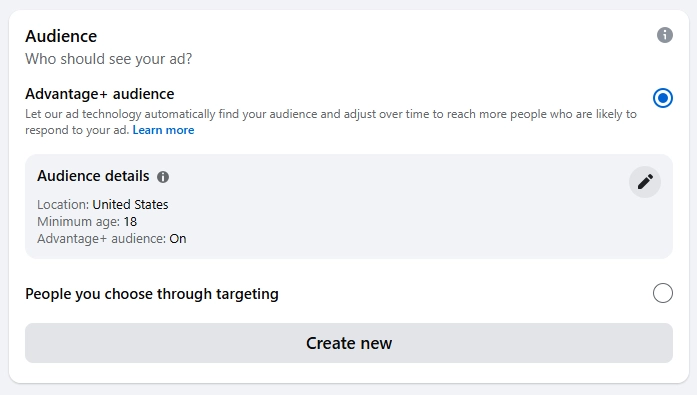
You’ll typically have two main approaches.
Advantage+ Audience
With Advantage+ Audience, Meta’s ad technology can automatically find people it considers relevant and adjust the audience over time.
Under this option, you may provide information such as:
- Gender
- Age
- Location
- Detailed targeting
The information you provide helps Meta understand the type of people you want to reach.
The current interface also explains that if you set a minimum age below 26, that minimum age is used as a requirement along with the location, while other audience criteria can be used as suggestions to help find the best audience for the ad.
For advanced targeting features, Meta directs advertisers to Ads Manager.
People You Choose Through Targeting
The second approach is People you choose through targeting.
This gives you more direct control over audience characteristics available in the Boost Post interface.
You can select available options such as:
- Gender
- Age
- Location
- Detailed targeting
Detailed Targeting
Detailed Targeting is part of the Audience section.
Depending on the available options, you can provide characteristics such as demographics, interest and behaviours.
This distinction between two audience approaches is important.
With Advantage+ Audience, you provide audience information that helps Meta’s system understand the type of people you want to reach, while its technology can use that information as part of finding people who are likely to respond.
With People You Choose Through Targeting, you take more direct control over the available audience selection.
When using audience targeting options such as gender or interests, the current interface may also apply age-related eligibility limitations, including requirements to target people over 18. Always check the age requirements displayed in your current set-up.
6. AI Info
If your ad contains media that was created or edited with AI, you may see an AI info option. Selecting it may result in an AI Info label being added to the advertisement. Review this setting based on how the media in your promotion was created or edited.
7. Ad Transparency
This section lets you provide information about who benefits from and pays for the ad. Information may also be displayed publicly on ad and in Meta’s Ad Library. Completing verification can allow information to appear alongside your ads.
8. Schedule and Duration
This section determines when your promotion starts, how long it runs and the budget you use.
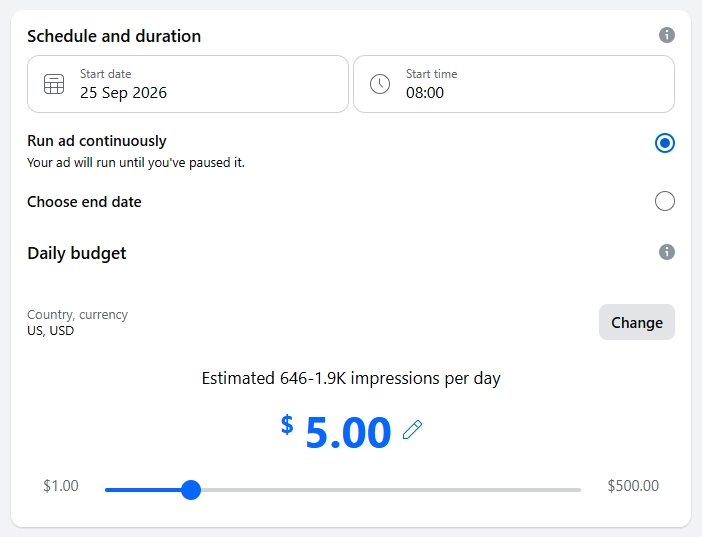
Start Date and Time
Choose when you want the promotion to start.
Run Ad continuously
You can allow the promotion to continue running rather than specifying an end date.
Choose End Date
If your campaign has a fixed deadline or a fixed testing period, choose an end date.
This can be useful when promoting an event, time-limited offer, announcement or short campaign.
Daily Budget
Your Daily Budget is the average amount that you can plan to spend on an ad each day.
The interface may also note that the daily budget excludes applicable Apple service fees, taxes and local fees.
Your budget should be based on what you are comfortable spending in relation to the objective and testing period.
Location and Currency
Your Location and Currency are important account settings.
The interface states that your Location and Currency can’t be changed once it’s set.
Estimated Daily Results
Before launch, Meta may display Estimated Daily Results based on your selected budget and other settings.
These are estimates shown before the promotion starts. They are not your actual results and are not a guarantee of performance.
Actual delivery and performance can vary based on factors such as audience, competition, creative, placements, demand and campaign conditions.
Is $10 a Day Enough?
It can be enough for a small test, but there is no universal budget that guarantees meaningful results.
What $10 per day can achieve depends on factors such as:
- Your goal
- Audience
- Market
- Competition
- Creative
- Placement
- Desired outcome
- Length of the test
Treat $10 per day as a potential testing budget, not as a guaranteed performance level.
9. Placements
Placements determine where your promotion can appear.
Available placements can vary depending on the set-up and selected options.
Advantage+ Placements
The interface describes Advantage+ Placements as allowing Meta to distribute your budget across available Meta placements, which can include Facebook, Messenger, Instagram and the Meta Audience Network.
This gives Meta more flexibility over where delivery occurs.
Manual Placements
With Manual Placements, you can choose where you want your promotion to appear.
Available options may include:
- Messenger
10. Payment Method
Add or confirm your payment method.
Check that:
- The payment method is valid
- Billing information is correct
- Required payment details are available
Available payment methods can vary by account and location.
11. Review and Make the Promotion Live
Before launching, review your:
- Goal
- Ad creative
- Advantage+ Creative
- Special Ad category
- Audience
- AI info
- Ad transparency
- Schedule and duration
- Budget
- Placement
- Payment method
Once everything is correct, launch the promotion.
Meta will review the advertisement under its advertising policies before or as part of the delivery process.
How to Measure a Boosted Post
Estimated daily results shown before launch aren’t your final performance data, they’re a forecast based on your settings. Once the boost is running, review its actual performance through the available post, advertising or Meta Business Suite reporting.
| What you want to evaluate | Metrics |
| Reach | Reach and impressions |
| Engagement | Likes, comments and shares |
| Website activity | Clicks and related results |
| Message | Number of messages and cost per result |
| Calls | Number of calls and cost per result |
| Page growth | Page likes and followers |
Evaluate the promotion against the goal you selected, rather than relying on reach or impressions alone.
For example: If your objective is engagement, a high number of impressions doesn’t automatically mean the promotion achieved what you wanted. Look at the actions generated in relation to the amount spent.
For campaigns requiring deeper analysis, testing, reporting and optimization, Ads Manager provides a broader performance-marketing environment.
When Should You Not Boost a Post on Facebook?
Consider holding off when:
- The post has no clear purpose
- The message is unclear
- The content contains an obvious error
- You can’t define the intended audience
- You haven’t decided what success means
- You need more campaign control than Boost Post provides
A paid promotion can increase distribution, but it doesn’t automatically fix weak messaging, unclear positioning, poor creative or an unsuitable offer.
Advertising should amplify a sound piece of content, not compensate for weakness in the content or strategy.
How to Stop or Remove a Facebook Boost
If you no longer want a promotion to continue, use the available promotion or advertising control to pause or stop it.
The exact control may vary as Meta updates its interface.
Stopping a boost prevents future delivery but It doesn’t reverse ad spend that has already occurred.
Fleviko’s Take
Our overall approach to how to boost a post on Facebook comes down to two questions: what’s your goal and how much control do you need over the boosting. We recommend choosing Boost Post when your primary goal is straightforward engagement, such as likes, comments and shares on an existing post. Boost Post can also support other goals available in its interface. However, when another business outcome is central and you need more structured measurement, analysis, testing, optimization and campaign control, we recommend considering Meta Ads Manager instead.
For Boost Post settings themselves, our practical recommendations are:
- Advantage+ Creative: Keep it enabled in most cases. Boost Post provides a more simplified creative workflow than Ads Manager, so allowing Meta to create available creative variation gives the system more flexibility during delivery. This is not a guarantee of better performance.
- Audience: For a broad engagement focused promotion, we recommend Advantage+ Audience when you are comfortable giving Meta more flexibility to find people who are likely to respond. But if you have a clearly defined audience and need more direct control over the available criteria, choose People you choose through targeting.
- Schedule and Duration: Use Run Ad Continuously when there is no fixed deadline, you have a defined daily budget and you plan to monitor performance regularly. Use an end date when the promotion has a specific deadline or fixed campaign period.
- Placement: Choose Manual Placement when you have a specific reason to control where the promotion appears. Choose Advantage+ Placement when you prefer Meta to automatically distribute delivery across available placements.
The practical distinction is simple: engagement focused promotion of existing content goes to Boost Post; other result oriented campaigns requiring greater control go to Meta Ads Manager.
Boosting is just the starting point in how to boost a post on Facebook effectively. We’ll be covering Meta Ads Manager next in this series, so stay tuned for more on Fleviko.
Frequently Asked Questions
1. Why Can’t I Boost Posts on Facebook?
The post, page, profile, ad account, selected goal or content may not be eligible. On newer pages or professional mode profiles, you may also see create an ad, Ad center or another advertising option instead of a direct Boost Post button. Following that flow may show whether the post is eligible for boosting or not.
2. How Much Does It Cost to Boost a Post on Facebook?
You set your own budget for a boosted post, starting from a small daily minimum (often just a few dollars a day, depending on your account or goal). There’s no fixed platform-wide price.
What you spend determines your estimated result which Facebook shows before you launch.
3. Do People Know When You Boost a Post on Facebook?
Yes, a boosted post is labeled as “Sponsored” or “Ad” in the feed, the same way any Facebook ad is. Anyone can also look up your active ads in Meta’s Ad Library.
4. How Do I Boost a Post on Facebook on My Phone?
Open the eligible page or professional mode profile, select the post or available advertising option, choose Boost Post when available and follow the settings shown. The exact buttons and layout may vary between devices and app versions.